
Django and Python can cause quite a headache in Windows environments. However, sometimes you have no choice and Windows is the OS that has to be used. It took me several hours, spent at googling, reading and testing until I got a configuration that worked in my setup. So, for anyone else in a similar situation I’d like to summarize my experiences.
The built-in web server in Django is really nice for developing and testing. However, it shouldn’t be used for a production setup. While there are a lot of tools for this purpose (e. g. uWSGI, Gunicorn), many of them are not available for Windows. The most appealing solution is most probably the usage of Docker which also works on Windows Server 2019. However, Docker requires Hyper-V for virtualization and since my Windows system is a VM itself, it depends on the configuration of the VM host whether Hyper-V is made available to the guest VMs or not.
An alternative that is most likely to work is Apache. All you have to do is to integrate your Apache installation with the Python/Django application. For all of the above mentioned solutions (and also for Apache) Django comes with a WSGI interface that bridges the web server to a Python application. On the Apache side you need a specific module, the „mod_wsgi“ module, that accomplishes the task. Unfortunately, this module is not shipped with a standard Apache distribution.
Basic setup
My setup is:
- Windows Server 2019 Desktop (VM)
- Python 3.8.1 64 bit
- Apache 2.4.41 64 bit
- PyCharm 2019.3.3
First of all, it seems to be important to have anything either 64 bits or 32 bits. Never mix it up!
I took the standard Python distribution which can be downloaded here. I installed Python as Administrator, added to PATH and installed it for „all users“. Use the „custom install“ and verify that the respective checkboxes are marked.
The Apache distribution may cause problems in combination with the other tools involved, so I downloaded it from Apachelounge. Extract it to „c:\apache24“, which seems to be the standard path that works out of the box for the other tools. I installed (that means copying from the archive) with my normal user account.
My pain points
First of all, I created a new Django project with PyCharm with its nice wizard. PyCharm supports three virtual environment managers, namely „virtualenv“, „pipenv“ and „conda“. For Django projects the Conda package manager is not recommended (don’t remember where I read it), „pipenv“ seems to cause trouble in combination for building the „mod_wsgi“ described later. So, there is only „virtualenv“ left. Something I learned at this point is that the current „virtualenv“ that is part of Python is actually „venv“. The real „virtualenv“ is a third-party package manager that has to be installed additionally. Moreover, for building „mod_wsgi“ it is recommended to use the third-party „virtualenv“ and not the built-in „venv“. However, when using PyCharm you have no choice, but to stick to the built-in „venv“.
PyCharm terminal issue
Setting up a new virtual environment with an empty Django project in PyCharm is a quick win. I had some issues when using the „terminal“ tab at the bottom of PyCharm because the virtualenv package information was different than the one I saw in project settings. There are some threads on the Jetbrains issue tracker concerning this problem. For the next steps it is safer to open a new command line shell, activate the virtualenv in this shell and to do the next steps in there. Double-check the actual virtual environment you are in.
Having read lots of hints it seems to be important to have the latest versions of (currently):
- pip 20.0.2
- setuptools 45.2.0
Moreover, virtualenv (the third-party one) is recommended, but I also succeeded with the build-in venv.
Building mod_wsgi
As mentioned above you need the „mod_wsgi“ for Apache in order to bridge the Apache web server with your Django application. Since this approach is several years old, you have to pay attention on the publishing date of articles and posts when googling this topic. For example, you could download the module pre-built for your platform, but lots of things may go wrong this way, leaving you with a non-working solution. Moreover, a lot of scenarios I found on the web concerning „mod_wsgi“, which promise to be very simple, are not applicable for Windows. So, my summary is that the best way is to build „mod_wsgi“ yourself, which is also recommended on the official webpage.
Fortunately, the build process is not difficult at all. You simply use „pip“ in your virtual environment:
https://pypi.org/project/mod-wsgi/
pip install mod_wsgi
Out of the box this approach won’t work because you need the respective toolset from Microsoft for the build process which can be found here. You actually only need the „build tools“, not Visual Studio. Scrolling down the page, you’ll find them in the „Tools for Visual Studio“ section. Maybe this direct download link works for you. Installing the „build tools“ you only need (presumably)
- MSVC v142 – VS2019 C++ x64/x86-Buildtools
- Windows 10 SDK
Having the build tools installed, you should give the „pip install mod_wsgi“ in your virtual environment a try. For me, it did not work :

Obviously, the build process does not find the Python libraries which are not part of the virtual environment where they seem to be expected. The issue seems to be quite new and could be solved for a while by using the third-party virtualenv. In this post the solution is to use the following pip-command instead:
https://github.com/GrahamDumpleton/mod_wsgi/issues/245
pip install https://github.com/GrahamDumpleton/mod_wsgi/archive/develop.zip
That worked for me and I finally got „mod_wsgi“ built and ready to use. I suppose that this issue may be fixed in future releases. You can check the result out with the command:
mod_wsgi-express module-config
You’ll get an output like this:

You will need this output later on. There’s a lot more you could do with „mod_wsgi-express“. However, nothing else seems to work on Windows. On Unix systems for example you could use „mod_wsgi-express“ to spin up an own web server.
Apache trouble
Next step is to put the newly created „mod_wsgi“ module in your Apache installation. As mentioned before, you should only use the Apachelounge distribution and install/copy the files in „c:\apache24“. I also added the Apache-bin directory to the system path „c:\apache24\bin“, but I’m not sure whether that is of any use. I installed Apache as a Windows service with
httpd.exe -k install
In my setup I maintained the Apache settings in the „httpd.conf“ (in the „apache24\conf“ directory) and in the „httpd-vhosts.conf“ (in the „apache24\conf\extra“ directory). My vhosts contains the following:

Based on the guidelines you should copy the output you receive from the „mod_wsgi-express module-config“ (see above) into the „httpd.conf“ file. Having googled lots of web pages I often found a „LoadFile“ directive, which is missing in my output (does not seem to matter).
I inserted the output in my „httpd.conf“ and tried to restart the Apache service using the „Services“ dialog (start as Administrator), but failed. The Apache service could not be started and threw an error message. I tried lots of things and finally ended up with this working solution:
- Deactivate (delete/comment) the „WSGIPythonHome“ in „httpd.conf“. I succeeded with just the „LoadModule wsgi_module“ directive (copy/paste from mod_wsgi-express)
- Remove any „WSGIPythonPath“ directives
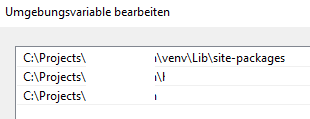
- Added a PYTHONPATH to the system-wide environment variables for the virtual environment site-package path, the Django project directory and the Django app directory (where the „wsgi.py“ is located):
For me it’s still a mystery why the „WSGIPythonHome“ and the „WSGIPythonPath“ directives haven’t worked or which values would have been correct to fill in. Obviously they made Apache crash on startup.
I’d like to emphasize that I didn’t change the standard „wsgi.py“ generated by Django. I’ve seen quite a lot of solutions modifying this file with the goal to activate the virtual environment from within the „wsgi.py“. That does not work in the built-in virtualenv because the „activate_this.py“ script is not available. Moreover, it is not necessary in this configuration because the „mod_wsgi“ already belongs to the virtual environment.
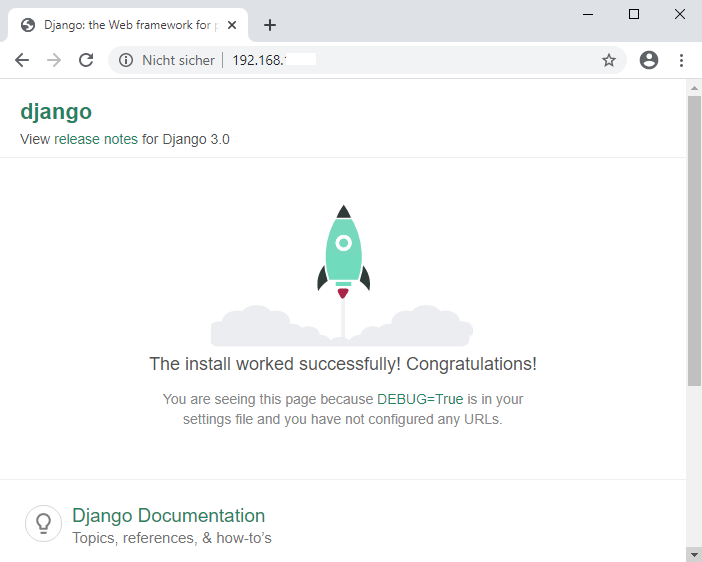
Finally with Apache and the PYTHONPATH defined, my Django installation is accessible via Apache:
Ein Kommentar zu „Deploying Django on Windows Server 2019 and Apache with MOD_WSGI“
Die Kommentare sind geschlossen.